Forms and Automatic User Creation in WP CRM
Forms and Automatic User Creation
In this tutorial we will see the typical steps involved in creating and publishing a form on the website, and using that form for automatic user creation.
We have seen how to set User Attributes and manually create users using those set attributes in the tutorial, “Creating Users and User Data”.
For form creation, we first need to set all user attributes in the Data table located under the Settings option of the CRM plugin, and save them. After that is done, we move on to the Roles Table.
Roles Table
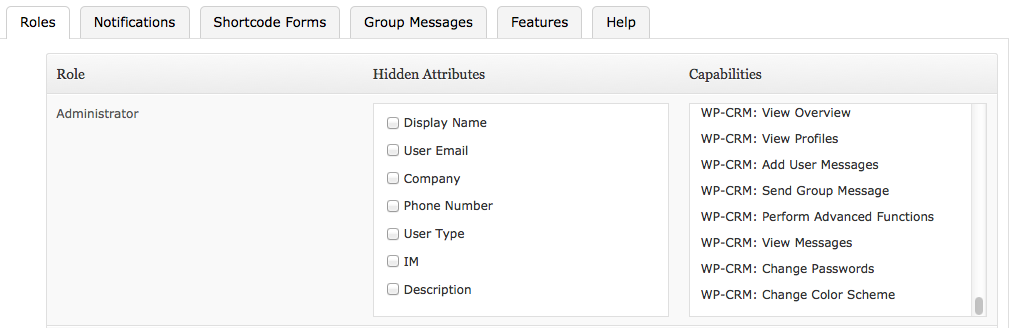
This table is mainly used to set user role settings. It comes with a set of predefined user roles that are displayed under the ‘Roles’ heading in the table.
- Administrator
- Author
- Blocked
- Contributor
- Editor
- Inactive
- Key Master
- Member
- Moderator
- Subscriber
Under the Hidden Attributes heading, if you observe carefully, you will see all the Data Table attributes you set for your users. You can choose any attributes you like for a particular user role. The Capabilities heading displays what degree of control every role has. ___
Shortcode Forms
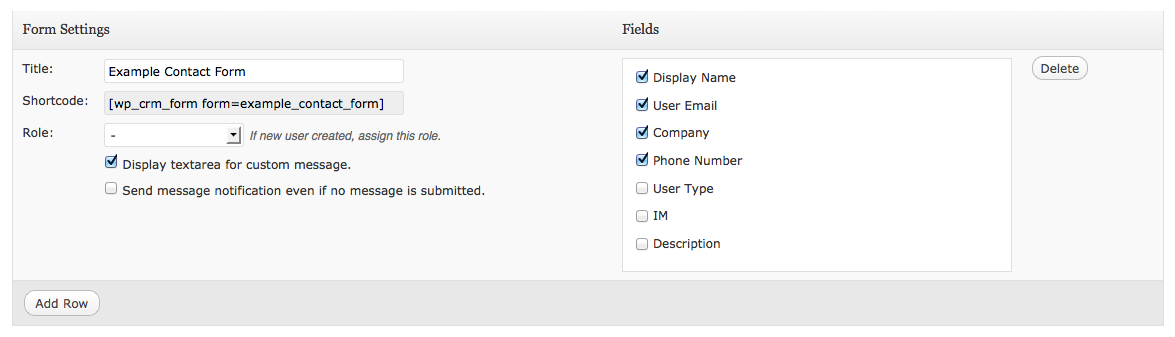
Once you are done setting your preferences in the Roles table, we move ahead to the ‘Shortcode Forms’ table. Here, give your form a Title. The Shortcode section is automatically generated by the plugin, so leave it alone for now. Go to the Roles dropdown box and choose what is the default type of user you want to create. Setting any role in this tab will give those privileges to every automatic user that is created. If you do not want to have any particular role assigned to every user who fills this form, set the roles to nil ( - ).
Moving on, on the right side you can see a section with the title ‘Fields’. Again, if you observe carefully, this section will display all the attributes you set in the Data table. You can now choose which of the fields you want to display on your website, in your form. You do not need to display all of the fields. Just check the fields you want displayed.
Below the Roles dropdown, you can see two check boxes. The first one, ‘Display text area for custom message’, if checked by you, will display a small textbox, which lets your users enter a custom message while filling out your form. This is good way for the users to send you a quick comment or question. The second one, ‘Send message notification even if no message is submitted’, if checked will notify you even if a users attempts to fill out your form, with actually hitting submit. We will talk about setting up Notifications in a minute. Once all the options on the Shortcode Forms page are set, hit Save Changes.
You can make multiple forms at any time. If you select the ‘Add Row’ option located at the bottom, it will create a new form template for you and you will again need to go through and set all the above mentioned options on that form as well.
Once you have saved you form, simply select the shortcode that is automatically generated and copy it. Now you are free to paste it in a new or existing post, page or any other custom post type that you use, in WordPress, and publish it. If you now go and hit refresh on that page, you will be able to see the form that you just created containing all the fields that you selected.
You can have multiple forms of the same page/post of on different pages on your website. Every form just needs to have a unique name.
Notifications
Just setting and displaying forms is not enough. When a user enters any information to be sent to you, you need to be notified about it. That is where the ‘Notifications’ table comes into play. If you observe this table, it lets you set three fields.
First on the very right, select from under Trigger Actions, the form that what this particular notification set for. As mentioned earlier, you can have multiple forms located at different places on you website. You will be able to see a lit of all these forms. Along with the forms you will also be able to see a list of notification actions if you have set any in the wp_crm_send_notifications() function. Select the appropriate form or action.
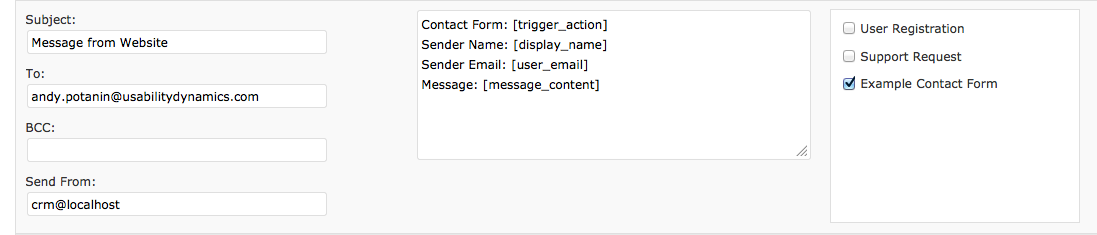
Once the correct form is selected, go to the Header section. Under there, you can set the,
- Subject: what the notification subject you want set every time a user uses the form, E.g. Subject: General Contact Message, Products A inquiry and so on.
- To: Here you put the email of the person you want notified. It need not necessarily be you. It can be some person from you group or company with deals with requests coming for that form. E.g. tech_support@abc.com
- BCC: Set an email address if you want to send a blind carbon copy to someone, E.g. lead_tech_support@abc.com
- Send From: Enter an email address or a name and email address using the format: John Smith
To see list of variables you can use in notifications open up the “Help” tab and view the user data structure. Any variable you see in there can be used in the subject field, to field, BCC field, and the message body. Example: [user_email] would include the recipient’s e-mail.
To add notification actions use the wp_crm_notification_actions filter, then call the action within wp_crm_send_notification() function, and the messages association with the given action will be fired off.
As always, ‘Add Row’ can be used to add as many notifications as you would like and Delete can be used to delete a particular notification.
Do not forget to save the changes you have made. Now that your forms and notifications are set, move to the Messages option under CRM.
Messages
This is the place where you will be able to view all the messages that come in through any of your forms. You will be able to Filter your messages using the filters listed on the right. __
###Automatic User Creation
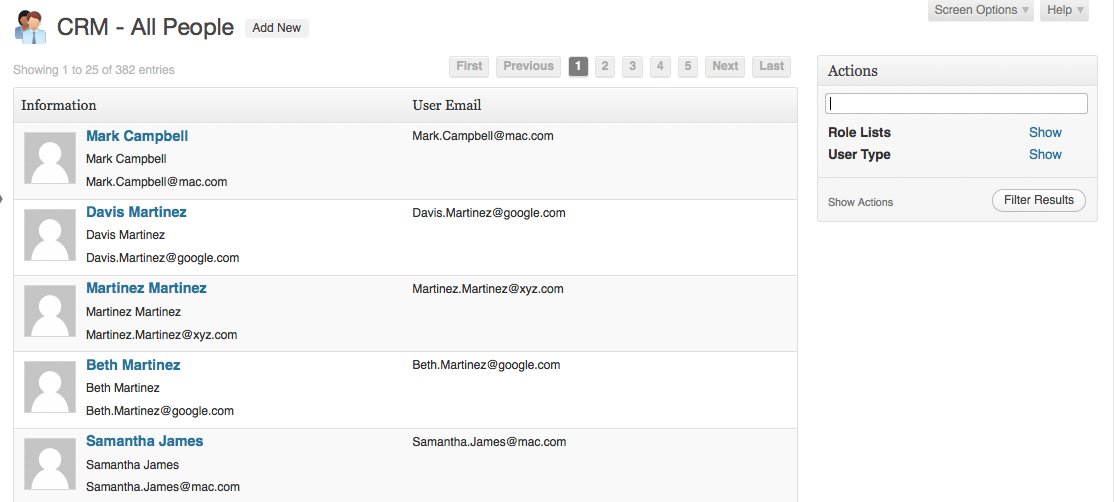
Every time a user enters some information in the form and clicks ‘Submit’ a new user will record will be created in the ‘All People’ section. You can then choose to either keep the user and fill in more details about him or go ahead and delete the user. All you user that are created manually and/or automatically will be recorded and displayed in the ‘All People’ section.
###Customizing ‘All People’ using UI table
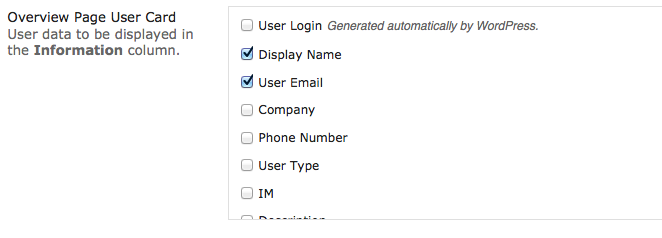
By now we have our attributes, forms, roles, notifications and user creation all set and running. You can also customize what information about your users you want to see in the ‘All People’ section. In order to do this, go to the UI table located in the Settings tab. Here using the ‘Overview Page User Card’, you can customize which attributes you want displayed about every user. You can choose the ‘Primary User Identification’ as well as Quick User Actions.
Overview user actions are displayed on the overview table below the User card and the available actions are stored in $wp_crm[‘overview_user_actions’]. By default, WP-CRM includes a “Password Reset” user action which is added in default_api.php To add a new action, attach a function to the ‘wp_crm_settings_lower’ filter and augment the $wp_crm settings array with a new user action.