Creating Users and User Data in WP CRM
WP-CRM allows you to significantly improve user management, easily create contact forms, and keep track of incoming contact form messages. Listed below are the steps required to create users and to manage user data.
There are two ways in which WP-CRM plugin lets you add users to you database. Either you can,
- Manually create a new user by entering data.
- A user can be directly created using a form on the website.
In this tutorial we will be looking at ‘Manually creating a user’.
After installing the WP-CRM plugin, you will be given four options to choose from.
- All People – This option will contain a list of all your users/ clients.
- New Person – This option will allow you to manually add a new user.
- My Profile - This option will let you edit information about yourself.
- Settings – The main option that enables all customizations and data management.
- Messages – This option will display all the messages sent using a published form

New Person
If you click on the ‘New Person’ option you will see that the CRM plugin comes set with some default fields to record user data. However, since you need custom data that applies to your users, we will look at how to obtain that. Before we choose the ‘New Person’ option of the CRM, we need to first determine what data, about your clients, you need to record. In order to do that, we start with the ‘Settings’ tab.
Settings Tab
When you go to the ‘Settings’ tab, you will be presented with a number of tables, which allow you to do various things. Here is a list of the default tables present.
- Main
- UI
- Data
- Roles
- Notifications
- Shortcode Forms
- Help
Data Table
For now, we only need to look at the Data Table. In the Data table, you can add or edit attributes, in the form of rows, which specify the kind of information (i.e. attribute) you want to store about your user.
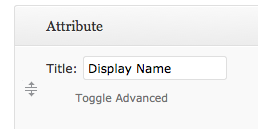
Let us see how we can go about setting custom attributes. An attribute has four sections.
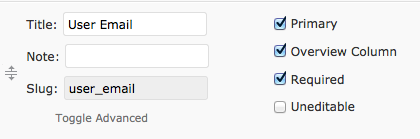
Title: This is the name of the attribute. E.g. Display name, Company name, Product type, Phone number and so on.
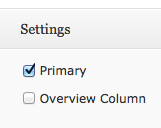
Settings: The two main options present under Settings are – Primary and Overview Column. The Primary option if selected, means, that attribute is an important one and will be put in a separate highlighted box at the beginning of every user profile. E.g. User Name can be a Primary attribute as it is essential to know who is your client. If Overview Column is selected, it gives you the freedom to filter users based on that attribute. E.g. Product type can be an attribute that has overview column checked. Then while looking at you list of users, you can quickly filter them based on which of you products they are using.
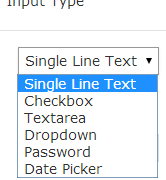
Input Type: This section determines what type of data the user is expected to enter. E.g. User Name will have input type ‘Single Line Text’. There are 5 types of input: Singe Line Text, Checkbox, Textarea, Dropdown and Password. Depending on the nature of the said attribute, you can set the input type.
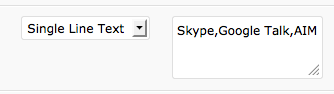
Predefined Values: This section is set if there is a set of predefined options that the user is expected to select from. E.g. For attribute Product Type, of input type Check Box, a string of product names need to be entered in the predefined values sections. Suppose we have Product A, Product B and Product C. These will be entered in the predefined values section separated by commas and no spaces. There is no limit to the number of predefined values that can be entered.
Toggle Advanced: For every attribute, there is a ‘Toggle Advanced’ option located right below Title. Clicking this will open a few more rules that you can choose to set about that particular attribute.
- Note: Lets you add a custom note about that attribute for you reference. Slug: Lets you choose a slug.
Under the Settings section, two more options open up,
- Required: If checked, that attribute value is absolutely compulsory to be entered before a record can be saved.
- Uneditable: Makes that attribute non changable once a value has been entered.
The ‘Add Row’ button at the very bottom lets you add you own custom attributes. Every attribute has a ‘Delete’ button on it, which lets you delete any of them at any time. There is no limit on the number of attributes you can add to the Data table.
Manual New Person Creation
Once you have entered some attributes, you can click ‘Save Changes’ located at the bottom of the page and your data table will be saved. Now if you go to the New Person option under you CRM plugin, you will be able to see all the attributes that you saved and manually created a new user and enter the values of the attributes you created in the Data table under Settings.
Automatic New Person Creation
In order to automatically record the information about clients who contact you, you will need to have a ‘form’ published somewhere on your website.